All extension modules support free demo mode, that is not time-limited, but a watermark will be inserted into the created images or videos. Extension modules require QuickPHOTO program for their installation – even a 30-day trial version can be used.
You can install the trial version of QuickPHOTO on a computer where another version of the program is already installed. Each version has its own independent settings.
If you purchase the program and eventually extension modules, you will receive a dongle containing the corresponding licenses. Once the dongle with appropriate license is found, the program and extension modules will be automatically activated.
Only one computer can use the license at a time. If the computer should be replaced, it is possible to transfer the dongle with the license to a new computer. Should you need additional licenses, contact your QuickPHOTO software supplier for pricing.
Which imaging devices are supported by QuickPHOTO programs?
Use the following links to go to the pages containing:
How can I get the latest version of QuickPHOTO program?
Contact your supplier or us for a quote. Older versions of QuickPHOTO can be upgraded to version 4 at a discounted price. It is also possible to upgrade the program to a higher version (e.g. QuickPHOTO CAMERA to QuickPHOTO MICRO or to QuickPHOTO INDUSTRIAL).
Users of QuickPHOTO 3.x can download and update the program to version 3.2 for free from the Downloads – Archive section.
Users of QuickPHOTO 2.x can download download and update the program to version 2.3 for free from the Downloads – Archive section.
How to setup a camera control via TWAIN interface in QuickPHOTO 3.x programs?
What is TWAIN interface?
TWAIN is an applications programming interface (API) and communications protocol that regulates communication between software and digital imaging devices, such as image scanners and digital cameras. This interface enables the QuickPHOTO programs to control also the third-party cameras, which are not directly supported in it.
Procedure of installation:
Connect and install your camera according to the guidelines of its manufacturer.
Download and install a TWAIN interface for your camera from the website of the its manufacturer (if it is available). Always install 32-bit version of a TWAIN interface, even if you use 64-bit version of Windows® operating system. If you would install 64-bit version of a TWAIN interface, it would not be available in QuickPHOTO programs.
Note: for some cameras, the device drivers and TWAIN interface installation can be performed by a single installer. For more information refer to the information provided by the camera’s manufacturer.
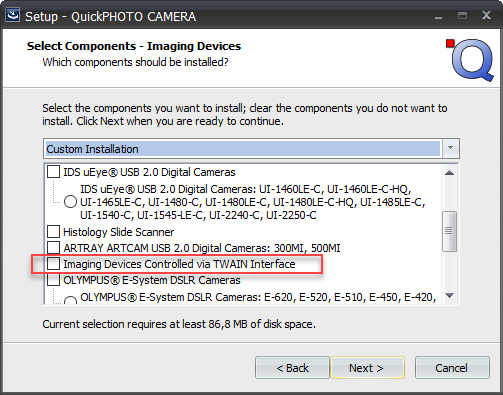
Install the QuickPHOTO program and during the installation select the Imaging Devices Controlled via TWAIN Interface option:
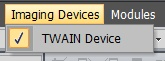
Run the installed QuickPHOTO program and select the TWAIN Device option from the Imaging Devices menu:
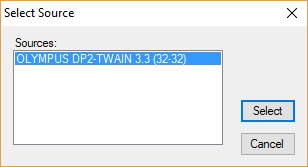
Select Source system dialog window will appear listing all the installed 32-bit TWAIN and WIA interfaces. You should be able to see the TWAIN interface for your camera in the dialog window. Select it by mouse and press the Select button to confirm (use only TWAIN interfaces, not the WIA ones).
Click the camera icon in the QuickPHOTO program’s toolbar or activate the Open Imaging Device Control Panel… option from the File menu. A window with camera’s live view and controls should appear. After acquisition, the image should appear in the main window of the QuickPHOTO program. Control window of the camera remains open, until it is manually closed. This behavior can be changed in the program options (Edit>Options… in Hardware Devices>Imaging Devices section in Properties of TWAIN Imaging Devices Control Panels part).
How to find out if QuickPHOTO will work on a new computer or with another operating system?
QuickPHOTO 4 supports Microsoft® Windows® 11 and 10 Version 22H2 (32 and 64-bit) operating systems. In older systems, use an older version of the program.
QuickPHOTO 2.3 to 3.2 programs support Microsoft® Windows® 11/10/8.1/7/Vista/XP (32 and 64-bit) operating systems.
You can download the latest dongle device driver for your operating system from the Downloads section. The QuickPHOTO programs are protected by a dongle which needs to be connected all the time you use the software. If you have an old LPT dongle (for parallel port interface), you can replace it by a USB dongle if required. For pricing, please contact your QuickPHOTO software supplier. The ECP or ECP+EPP mode of the LPT port should be set in the computer BIOS, in case of use of the LPT dongle. Use of an additional LPT interface card is not recommended. New USB dongle
What to do when the QuickPHOTO program cannot connect the camera?
Make sure the camera is connected and its device drivers are properly installed.
Some USB hubs and extension cords can cause problems. Do not connect the camera to an USB hub or an extension cord.
Continue to camera specific section below.
Canon® EOS DSLR and Mirrorless Cameras
Which position of mode dial should be set to control the camera from a computer?
Switch the mode dial to Av position for automatic mode or M position for manual mode.
No image is acquired when the Capture button is pressed.
This is the default behaviour of all mirrorless cameras (EOS M and EOS R series) without a lens attached. The Release shutter w/o lens option has to be enabled in the camera menu. According to the camera type, proceed as follows (for more information, see your camera user guide):
Canon EOS M50 and M200
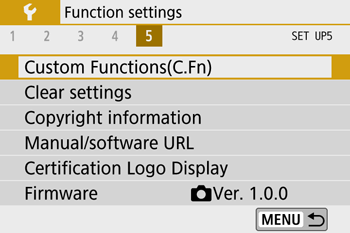
Turn on the camera and press the MENU button.
Navigate to the Function settings tab and press the SET button. Note: EOS M200 camera also includes Wireless settings tab.
Navigate to submenu 5, choose Custom Functions(C.Fn) option and press the SET button.
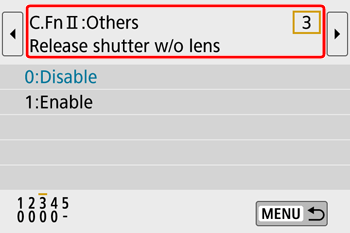
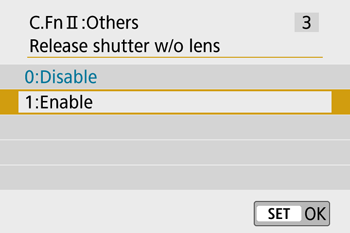
Choose Release shutter w/o lens option and then press the SET button.
Choose 1: Enable option and press the SET button.
Press the MENU button three times to exit the menu.
Canon EOS R
Turn on the camera and press the MENU button.
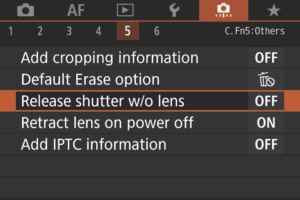
Navigate to submenu 5(C.Fn5:Others) in Custom Functions / My Menu, choose Release shutter w/o lens option and press the SET button.
Choose ON option and press the SET button.
Press the MENU button twice to exit the menu.
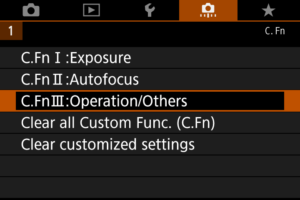
Canon EOS RP
Turn on the camera and press the MENU button.
Navigate to submenu 1 in Custom Functions / My Menu, choose C.Fn III: Operation/Others option and press the SET button.
Choose Release shutter w/o lens option and then press the SET button.
Choose 1: Enable option and press the SET button.
Press the MENU button twice to exit the menu.
How to avoid display of an unwanted window when a Canon® EOS DSLR camera is turned on or connected to the computer?
This behavior is caused by AutoPlay feature of Microsoft® Windows® operating system. To turn off this feature follow these instructions:
Microsoft® Windows® Vista7/8/8.1/10/11
Open Control Panel window of the operating system, click on Hardware and Sound category and then select the AutoPlay option. In Devices part select Take no action options for your camera, which should be listed there e.g. as Canon EOS 2000D (Rebel T7).
Note: the same DSLR camera type may appear more than once in the list – once for each USB port, it was connected to. In such case, it is recommended to set the Take no action option for all its displayed records.
Microsoft® Windows XP
Turn the DSLR camera on and connect it to a computer. Open My Computer window, right click on Canon® EOS DSLR camera icon and select Properties option. Switch to Events tab in displayed window and select Take no action option in Actions part. Press OK button to confirm the changes.
The DSLR camera cannot be connected within QuickPHOTO program and it is not listed in the Device manager?
Enabled Wi-Fi feature can be responsible for such DSLR camera behavior. The following procedure will help you to disable the feature for Canon® EOS 2000D / Rebel T7 DSLR camera. Turn on the DSLR camera, press MENU button and use arrows to select the third tab with yellow wrench symbol. Select Wi-Fi/NFC option and press SET button. Use arrows to select Disabled option and press SET button. Disconnect and reconnect the DSLR camera to a PC using a USB cable. The DSLR camera should be listed in the Device Manager in Portable Devices section now and should be ready for use. The procedure for other DSLR camera models is similar. You can find more information in the user guide of the camera.
The live view has a low frame rate.
In Control Panel of the Microsoft® Windows® operating system go to System and Security -> Power Options section and make sure you are not using Power saver plan. Use Balanced or eventually High performance plan.
Make sure you are using the latest version of QuickPHOTO program including the newest updates of the Canon® EOS DSLR cameras control panel. You can find the installation files on the Downloads page.
It is recommended to use 64-bit Microsoft® Windows® 7 or newer operating system.
Use a more efficient computer. It is recommended to use a processor with high single thread performance, e.g. Intel i5-3470 or better.
Try to reduce the size of the DSLR camera control panel in order to decrease the live view area.
The message “The battery is empty. Replace the battery or connect the AC adapter.” is displayed.
Make sure the AC adapter is properly connected. If you use a battery in your camera, make sure it is fully charged.
If the problem persists, your DSLR camera may not be compatible with the installed version of QuickPHOTO 3.x program. Go to Downloads – Archive page and download the latest version of QuickPHOTO 3.2 program. If available, also download the latest update of the Canon® EOS DSLR cameras control panel.
Acquired images are dark at one side.
This unwanted effect may appear when acquiring images with very short exposure times in the mode of automatic (in some cases also in manual) exposure mode. In the automatic exposure mode lower the microscope illumination intensity or decrease the sensor ISO sensitivity. In case of manual exposure mode set longer exposure time.
How to change Auto Power Off setting?
By default, Canon® EOS DSLR cameras turn off after 30 seconds of inactivity. This setting can be changed for Canon® EOS 2000D / Rebel T7 DSLR Camera as follows (the procedure for the other models is similar – you can find more information in your DSLR camera user guide).
Turn on the DSLR camera and disconnect the USB cable. Press the MENU button to activate the camera menu and use the arrows to select the first tab with a yellow wrench symbol. Select Auto power off and press the SET button. Use the arrows to select the desired setting and press the SET button. For microscopy use it is recommended to select the Disable option.
Error message “Access Violation at address...” is displayed.
Make sure the consumer/DSLR camera is turned on and connected to the computer by a USB cable. If you are using a battery, make sure it is fully charged.
OLYMPUS® SP and CAMEDIA® consumer cameras: Example for OLYMPUS® C-7070WZ
If an exclamation mark is displayed next to the device name, right-click the device and select Uninstall option. Turn the camera off and on again. The driver should be reinstalled automatically.
If you are using OLYMPUS® E-330 DSLR camera, follow these steps:
Make sure that your operating system is Microsoft® Windows® XP SP3 and that you have an account with administrative privileges.
Make sure that the camera has firmware in version 1.2 or later. To check the firmware version follow these instructions: turn on the camera, disconnect the USB cable, press MENU button, go to Settings 2 menu and select Firmware option. If the firmware is older, update it using OLYMPUS® MASTER 2 program supplied with the camera (internet connection is required to update the firmware) or contact authorized OLYMPUS® service.
Run the Camera Setup wizard (Program Files\Common Files\OLYMPUS\service\setupcam.exe) and follow the instructions. Once finished, turn the camera off and on again.
How to switch the OLYMPUS® consumer/DSLR camera to Computer Control or Mass Storage mode?
OLYMPUS® consumer/DSLR cameras have two modes:
STORAGE (default) for downloading images in which the consumer/DSLR camera is accessible as a Mass Storage drive.
CONTROL to control the consumer/DSLR camera from a computer.
To control the consumer/DSLR camera from QuickPHOTO program, switch it to CONTROL mode by following these steps:
OLYMPUS® E-330, E-410 and E-510 DSLR cameras
In the camera Settings 2 (the tool symbol with number 2) menu select the USB MODE option. Press the right arrow and select the CONTROL option. Press OK button to confirm the changes.
OLYMPUS® E-3, E-420, E-450, E-520 and E-620 DSLR cameras
In the camera Settings 1 (the tool symbol with number 1) menu or Custom menu (the symbol with cogwheels) for E-620 type select the DISP/sound/PC (the tool symbol with D letter) option and press the right arrow. Select the USB MODE option and press the right arrow. Select the CONTROL option and press OK button to confirm the changes.
OLYMPUS® E-600 DSLR camera
In the camera Settings menu (a tool symbol) select the MENU DISPLAY option and press the right arrow. Select the ON option and press OK button to confirm the changes. Furthermore, in the Custom settings menu (the symbol with cogwheels) select the DISP/PC option and press the right arrow. Select the USB MODE option and press the right arrow. Select the CONTROL option and press OK button to confirm the changes.
OLYMPUS® SP and CAMEDIA® series consumer cameras
Use the mode dial of the switched on camera to turn the camera to P mode and open the memory card cover. The Card cover open warning appears. Then first press OK/Menu button with QuickView button (older models: turning LCD screen on/off). Hold down both buttons for about 3 seconds. The CAMERA/SDK SETUP menu appears. From USB menu select CONTROL (older models: ON) option, press OK button to confirm the changes and close the memory card cover.
These DSLR cameras can be used from standard accounts automatically.
OLYMPUS® E-330 DSLR camera
This camera can not be used from standard accounts, administrative privileges are required.
OLYMPUS® SP and CAMEDIA® series consumer cameras
In 64-bit operating systems, these consumer cameras can not be used from standard accounts, administrative privileges are required.
In 32-bit operating systems to control the consumer camera from standard accounts, proceed as follows:
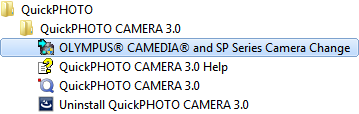
Run OLYMPUS® CAMEDIA® and SP Series Camera Change tool from Start menu of Microsoft® Windows® operating system (requires administrative privileges). Sample image for QuickPHOTO CAMERA 3.0 in Windows® 7
Follow the instructions in this wizard.
The consumer camera must be turned off and on again once the wizard has finished.
The live view is not displayed correctly or a message “No video device is selected. Live view won't be available.” appears.
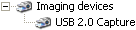
In the Device manager of the operating system ckeck that the live view displaying device drivers are installed properly.
AV USB 2.0 Pro device:
Grandtec Grand AV USB 2.0 device:
Leadtek Winfast VC100 XP (PCI) device:
Make sure that the camera video output is connected to the yellow cinch (RCA) connector of the live view displaying device.
Make sure that correct live view displaying device, PAL or PAL-B video standard and composite input is selected in the OLYMPUS® SLR/Consumer Cameras section of QuickPHOTO Options. You can use the Restore button to restore the default setting. Press OK button to save the settings.
Make sure the camera’s output video standard is set to PAL.
OLYMPUS® E-system digital SLR cameras
Disconnect all cables from the camera. Activate the camera’s menu and go to Settings 2 (key symbol with number 2) submenu. Make sure PAL option is set in VIDEO OUT selection.
OLYMPUS® SP and CAMEDIA® cameras
Disconnect all cables from the camera except the power. Activate the camera’s menu and go to Set submenu. Make sure PAL option is set in VIDEO OUT selection. Furthermore, set OFF option in ALL RESET selection.
Check brightness, contrast, saturation and hue values on Live image tab of the camera control panel. Press the Default button to reset these values.
Make sure no codec packs like ACE Mega CoDecS Pack, Codec Pack All in 1, K-lite Codec Pack, ffdshow, Vobsub etc are installed. If some of them are installed, uninstall them.
If you have OLYMPUS® E-system digital SLR camera and Grand AV USB 2.0 live view displaying device, make sure the USB cables of these devices are not connected to the same USB controller.
Make sure the latest video card drivers are installed.
If the live view still is not displayed, the QuickPHOTO program configuration file may be corrupted. It contains all QuickPHOTO settings (including calibrations in QuickPHOTO 2.0 through 2.3 program versions). Backup calibrations and other important settings before proceeding.
Make sure QuickPHOTO program is not running. Remove “config.xml” configuration file from QuickPHOTO program folder (typically C:\Program Files (x86)\QuickPHOTO CAMERA 3.2) and run QuickPHOTO program. Go through the Setup Wizard and configure the live view displaying device correctly.
Error message due to cresprop.ax file appears.
This happens when using AV USB 2.0 Pro device on a computer where Grand AV USB 2.0 device has been used. Go to Downloads – archive section and use AV USB 2.0 Device Drivers Cleaner tool to remove Grand AV USB 2.0 device drivers from the operating system.
ARTRAY ARTCAM Digital Cameras
The live view is not displayed correctly or the camera drivers cannot be installed.
The problem is caused by poor USB connection quality. Do not use USB hubs or extension cords. Connect the camera to another USB port. Prefer the ports on the back side of your computer, which comes out of the motherboard. If the problem persists, use an additional internal USB controller.
A camera disconnecting occurs when the camera control panel is opened.
When using automatic exposure mode, make sure the specimen in the camera’s field of view is illuminated sufficiently, or use manual exposure mode.
IDS uEye® Digital Cameras
The camera cannot be connected within QuickPHOTO program or “Access violation at address...” error message pops up.
First, make sure you are using compatible version of QuickPHOTO program and the operating system in the Table of imaging devices compatibility. Then, check the camera drivers:
Cameras except UI-1440-C
Make sure IDS uEye® camera drivers in version 3.6 are installed in Programs and Features window of Microsoft® Windows® operating system . If older or newer drivers are installed, uninstall them. Then install drivers in version 3.6 from Drivers folder on QuickPHOTO installation disk. Then reinstall QuickPHOTO program and let it install the correct drivers (if this feature is available). Otherwise, install drivers in version 3.6 from the Drivers folder on the QuickPHOTO installation disk.
UI-1440-C Camera
The procedure for this camera is analogous, but drivers in version 2.4 are required.
Analog Video Sources
The live view is not displayed.
Make sure the live view cable is plugged into both the camera and the live view displaying device. The yellow cinch connector camera output should be plugged into the yellow cinch connector input of the live view displaying device.
Open Edit -> Options… menu in QuickPHOTO program. In Analog Video Source setting make sure the Input is set to Composite and the Video standard is set to PAL or PAL-B. You can use Restore button to restore default settings. Press OK button to confirm the changes.
Make sure no codec packs like ACE Mega CoDecS Pack, Codec Pack All in 1, K-lite Codec Pack, ffdshow, Vobsub, etc. are installed. If some of them are installed, uninstall them.
OLYMPUS®, CAMEDIA® are registered trademarks of OLYMPUS Corp.
Microsoft®, Windows® are registered trademarks of Microsoft Corp.
Canon® is a registered trademark of Canon Inc.
uEye® is a registered trademark of IDS Imaging Development Systems Inc.
 Note: EOS M200 camera also includes Wireless settings tab.